How to Draw Deer Antlers
I. Understanding the Anatomy of Deer Antlers
Deer antlers are fascinating structures that serve multiple purposes for these majestic animals. Understanding their anatomy is essential for accurately depicting them in art.
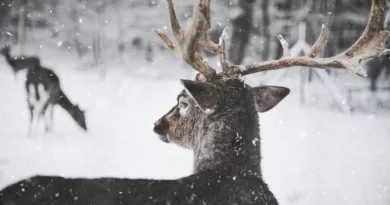
Antlers are composed of bone and are actually an extension of the deer’s skull. They are not permanent fixtures but rather grow and shed annually. This growth process is triggered by hormones and typically occurs during the spring and summer months. As the antlers develop, they are covered in velvet, a soft tissue that supplies nutrients and helps with the antler’s growth. Once fully formed, the velvet is shed, revealing the bony structure underneath. Stag deer, or male deer, typically possess antlers, while female deer, known as does, do not. These striking appendages come in various shapes and sizes depending on the deer species and the age and health of the individual deer.
II. Gathering the Necessary Art Supplies
In order to successfully sketch and draw deer antlers, it is essential to gather the necessary art supplies beforehand. These supplies will not only aid in the creation of realistic and accurate drawings, but also ensure a smooth and enjoyable artistic process.
First and foremost, a set of quality pencils is crucial. Pencils with varying degrees of hardness (such as HB, 2B, 4B, etc.) will allow you to achieve different levels of shading and detail. Additionally, having an eraser handy is essential for correcting any mistakes or refining the shape of the antlers as you go along. Consider investing in a kneaded eraser, which can easily be molded and shaped to fit the specific areas that need adjustment. Lastly, a sharpener is essential to keep your pencils in optimal condition for creating fine lines and precise details. A small container or pouch to hold all of your supplies will keep them organized and easily accessible, avoiding unnecessary interruptions during the drawing process.
III. Sketching the Basic Structure of Deer Antlers
When it comes to sketching the basic structure of deer antlers, it’s important to start with a solid foundation. Begin by visualizing the overall shape and size of the antler. Deer antlers typically have a main beam that extends from the deer’s head and branches out into smaller tines. These tines can vary in number and curvature depending on the species and age of the deer. It can be useful to refer to reference photos or observe real antlers to get a sense of the variations and unique characteristics of each type.
Once you have a mental image of the antler’s basic structure, use light, loose lines to outline the main beam and tines. Keep in mind that deer antlers are typically asymmetrical, so it’s important to pay attention to the curves and angles on both sides. Start with a simple sketch and gradually build up the details, refining the shape and ensuring that the proportions are accurate. Remember to keep your lines loose and light at this stage; it’s easier to make adjustments and modifications later on. As you gain more confidence, you can experiment with different interpretations and styles, adding your own artistic flair to the basic structure of the deer antlers.
• Visualize the overall shape and size of the antler
• Start with a main beam that extends from the deer’s head
• Branch out into smaller tines, which can vary in number and curvature
• Refer to reference photos or observe real antlers for variations and unique characteristics
• Use light, loose lines to outline the main beam and tines
• Pay attention to curves and angles on both sides as deer antlers are typically asymmetrical
• Gradually build up details while refining the shape and ensuring accurate proportions
• Keep lines loose and light for easier adjustments later on
• Experiment with different interpretations and styles to add artistic flair
IV. Adding Details and Texture to the Antler Shape
When adding details and texture to the antler shape, pay careful attention to the intricate features and natural patterns. Begin by observing reference images or studying real antlers to understand the specific texture and details you want to recreate in your drawing. Texture can be achieved through various shading techniques, such as cross-hatching, stippling, or using hatching lines to indicate furrows or ridges. Experiment with different pencils or shading tools to achieve the desired effect. Remember to vary the pressure and direction of your strokes to create dimensionality and depth within the antler shape.
After establishing the overall texture, focus on adding smaller details that will bring your drawing to life. These details can include variations in color, tiny cracks, or even moss or lichen that might be present on the antlers. Take the time to observe and replicate these elements accurately, as they contribute to the realism and believability of your artwork. By meticulously adding the right details and texture, you can transform a simple antler shape into a visually captivating and realistic depiction.
V. Creating Realistic Shadows and Highlights
To create realistic shadows and highlights in your deer antler drawing, it’s important to understand how light interacts with the form. Shadows are areas that are blocked from direct light, while highlights are spots that catch the light and appear brighter. By accurately depicting these elements, you can add depth and dimension to your artwork.
Start by observing the direction and intensity of the light source in your reference image or in your imagination. This will help you determine where the shadows and highlights should be placed. Use a light pencil to lightly sketch in these areas, making sure to follow the contours of the antler shape. Gradually darken the shadowed areas, gradually lightening the highlighted areas, using various shading techniques such as hatching, cross-hatching, or stippling. Remember to blend the transitions between light and shadow, creating a smooth and natural appearance. Lastly, step back and assess your drawing to ensure that the shadows and highlights accurately depict the light source and enhance the three-dimensional quality of the antler form.
By mastering the art of creating realistic shadows and highlights, you can bring your deer antler drawing to life. These elements add depth, volume, and realism to your artwork, making it visually captivating. With practice and observation, you will develop the skills needed to accurately depict the interplay of light and dark, adding an extra layer of dimension to your drawings. So, grab your pencils, study the play of light, and explore the fascinating world of shadows and highlights in your deer antler compositions.
VI. Incorporating Curves and Branches into the Antler Design
When it comes to incorporating curves and branches into the design of deer antlers, there are various techniques that can be utilized to achieve a realistic and visually pleasing result. One approach is to carefully study reference images of actual deer antlers, paying close attention to the way that curves and branches naturally flow and connect. This observation of natural forms can then serve as a guide when adding these elements to your own antler design.
Another method to incorporate curves and branches is to consider the overall composition and balance of your drawing. By strategically placing curves and branches, you can create a sense of movement and harmony within the antler design. The curves can mimic the graceful lines of the deer’s body, while the branches can add complexity and intricacy to the overall structure. Experimenting with different arrangements and positioning can help you find the perfect placement of curves and branches that complements your desired style and aesthetic.
VII. Adding Depth and Dimension to the Antlers
To truly bring your deer antler drawings to life, adding depth and dimension is essential. This step creates the illusion of three-dimensionality and makes the antlers appear more realistic. Start by shading the areas that would naturally be in shadow, such as the areas underneath the branches and curves. Use a soft pencil or charcoal to create smooth and subtle shading. Remember to keep in mind the direction of light source to ensure consistency in your drawing.
Another technique to enhance the depth of your antler drawing is to use hatching and cross-hatching. These methods involve creating a series of parallel lines or intersecting lines to build up areas of texture and shadow. By varying the spacing and density of the lines, you can achieve different effects and create a sense of volume within the antlers. Experiment with different pencil pressures and mark-making techniques to achieve the desired level of depth and dimension in your drawing.
VIII. Exploring Different Styles and Shapes of Deer Antlers
Exploring different styles and shapes of deer antlers brings a sense of creativity and personalization to your artwork. By varying the style and shape of the antlers, you can depict different deer species or emphasize specific characteristics. There is a wide range of possibilities when it comes to deer antler designs, from simple and elegant to intricate and elaborate.
One approach to exploring different styles and shapes is to study references of real deer antlers. Observing the variations in size, curvature, and branching patterns will provide insight into the diverse forms that antlers can take. Additionally, researching different deer species will allow you to understand how their antlers differ and adapt your drawings accordingly. Experiment with different proportions, angles, and shapes to create a unique and visually interesting representation of deer antlers.
The flexibility of artistic interpretation also allows you to incorporate your personal style into your deer antler drawings. You can experiment with different textures, patterns, or even incorporate symbolism into your designs. Whether you prefer a more realistic approach or a stylized representation, exploring different styles and shapes of deer antlers will elevate the overall visual impact of your artwork. Ultimately, the creative possibilities are endless, allowing you to create captivating and distinct deer antler drawings that showcase your artistic talent.
IX. Enhancing the Antler Drawing with Additional Elements
When enhancing your antler drawing with additional elements, you can choose to incorporate other elements from nature to create a more dynamic composition. Consider adding leaves, flowers, or branches around the antlers to give them a natural and organic feel. You can also experiment with different textures and patterns to make the antlers stand out even more. By introducing these additional elements, you can create a more visually captivating drawing that draws attention to the intricate beauty of the antlers.
Another way to enhance your antler drawing is by incorporating a sense of movement or action. You can achieve this by adding animals or birds in the background, suggesting that the deer is in motion or interacting with its environment. This can bring a sense of storytelling to your artwork, making it more engaging and intriguing to the viewer. By carefully choosing the additional elements and considering their placement and composition, you can elevate your antler drawing and create a captivating and visually appealing piece of art.
X. Tips and Tricks for Perfecting Your Deer Antler Drawings
While drawing deer antlers, there are several tips and tricks that can help you perfect your artwork. Firstly, it is essential to observe real-life references or high-quality images of deer antlers to ensure accuracy and capture the intricate details. Pay close attention to the curves, branches, and texture of the antlers, and try to replicate them as realistically as possible. Additionally, practicing sketching the basic structure of antlers will help you gain a better understanding of their proportions and overall shape. Start with simple, light pencil strokes and gradually build up the details to create a more realistic representation.
Another tip for perfecting your deer antler drawings is to focus on creating depth and dimension. Shadows and highlights play a crucial role in bringing your artwork to life. Study how light hits the antlers and where the shadows fall, then use shading techniques to replicate these effects. By incorporating realistic shadows and highlights, you can add depth to your drawings and make them appear more three-dimensional. Additionally, don’t be afraid to experiment with different styles and shapes of deer antlers. Branch out and explore various creative interpretations to make your artwork unique and visually captivating. Ultimately, remember that practice is key to improving your drawing skills, so keep refining your techniques and honing your craft to achieve stunning deer antler drawings.
How can I understand the anatomy of deer antlers?
To understand the anatomy of deer antlers, it is helpful to study reference images or diagrams that show the different parts and structures. Pay attention to the main beam, tines, and any additional branches or curves.
What art supplies do I need for drawing deer antlers?
You will need basic drawing supplies such as pencils, erasers, and paper. Additionally, having different shading tools like charcoal or graphite pencils can help add depth and texture to your drawing.
How do I sketch the basic structure of deer antlers?
Start by lightly sketching the main beam and then add the tines and branches. Pay attention to the angles and proportions. Use basic shapes like circles and ovals to outline the different parts.
How can I add details and texture to the antler shape?
Use cross-hatching or shading techniques to add texture to the antlers. Study reference images to observe the specific patterns and textures found in deer antlers.
How do I create realistic shadows and highlights in my antler drawing?
By observing the direction and intensity of light in your reference image, you can add shadows and highlights accordingly. Use a range of values to create depth and dimension.
How can I incorporate curves and branches into my antler design?
Study reference images to understand the flow and positioning of curves and branches. Use light, loose lines to sketch these elements and then gradually add more detail and definition.
How do I add depth and dimension to my antlers?
Use shading techniques to create areas of darkness and light, adding depth to your drawing. Pay attention to the contours of the antlers and use shading to emphasize volume.
Can I explore different styles and shapes of deer antlers?
Absolutely! Experiment with different styles and shapes to add variety to your drawings. You can even take inspiration from different deer species, as antler shapes can vary.
How can I enhance my antler drawing with additional elements?
You can incorporate elements such as leaves, flowers, or a natural background to complement the antlers. Consider adding these elements to create a more complete and visually appealing composition.
What are some tips and tricks for perfecting my deer antler drawings?
Some tips include practicing regularly, studying reference images, experimenting with different techniques, and paying attention to details. Don’t be afraid to make mistakes and learn from them.